Halo pembaca setia blogger, kali ini saya akan memposting tentang "Flow Sensor with Arduino UNO". I forget that I'm using English language for my topic. If you interested with this topic and you are an Indonesian men/woman or both (hanya jika anda tidak mengerti bahasa inggris dan ingin tau keseluruhan topik ini silahkan kirimkan email di sarah.annisaa230893@gmail.com) you could send me an email.
Okay. Let's begin to play Arduino UNO. Basically you don't need to being stressful to remember what kind of language that you will be used in Arduino UNO because it's using C language. Arduino UNO have been an open source programming board and it has a lot of library source in order to make it easier and friendly (I guess). You just need "Google" and search what kind of programming that you need. Also you could learn from that program. If you could you can developing that simple program become more complicated program .
- Stuff that you will needed
- Bread Board
- Arduino UNO software ( https://www.arduino.cc/en/Main/Software )
- Arduino UNO.
- Flow sensor
- 1 kilo ohm resistor.
The price is about 80K for Flow Sensor, 250K for Arduino UNO, 30K for bread board, and 20 for 1 k ohm resistror in IDR.
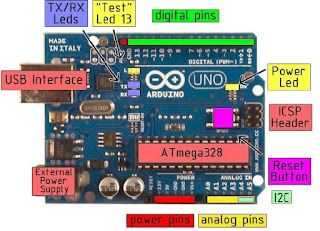
- Prepare your Arduino UNO... Connect the USB interface to you PC.
- Run Arduino programming.
3. Then copy and paste this program
--------------------------------------------------------------------------------------------------------
//*Simple Flow Sensor Programming*//
volatile int NbTopsFan;
int hallsensor = 2;
void rpm ()
{
NbTopsFan++;
}
void setup ()
{
pinMode(hallsensor, INPUT);
Serial.begin(9600);
attachInterrupt(0, rpm, RISING);
}
void loop ()
{
NbTopsFan=0;
sei();
delay (1000);
cli();
int Calc = ((NbTopsFan*60)/7.5);
int L_min = (Calc/60);
int mL_sec= ((L_min*1000)/60);
int nilai_akhir= mL_sec - (mL_sec*30/100);
Serial.println(nilai_akhir, DEC);
}
---------------------------------------------------------------------------------------------------
4. While you copying that program, you could prepare the circuit.
5. Using resistor will be necessary, but if you don't want to use it, you could prepare your circuit base on this picture bellow.
6. When you have copied the program and the circuit already to be used the next step is compiling the program. Click the "check" button on arduino program.
7. If there is no problem with the program then you could upload the program, click "arrow" button.
8. Then the water flow sensor already to measure. if you want to use ml/s you just need change "Serial.println(nilai_akhir, DEC);" to "Serial.println(mL_sec, DEC);"
This is the final result of my flow sensor measurement... Im using ml/s. Good luck and happy for playing arduino. :D
Wassalamualaikum wabarakatuh
Barokallah Always :-)


0 comments:
Post a Comment